
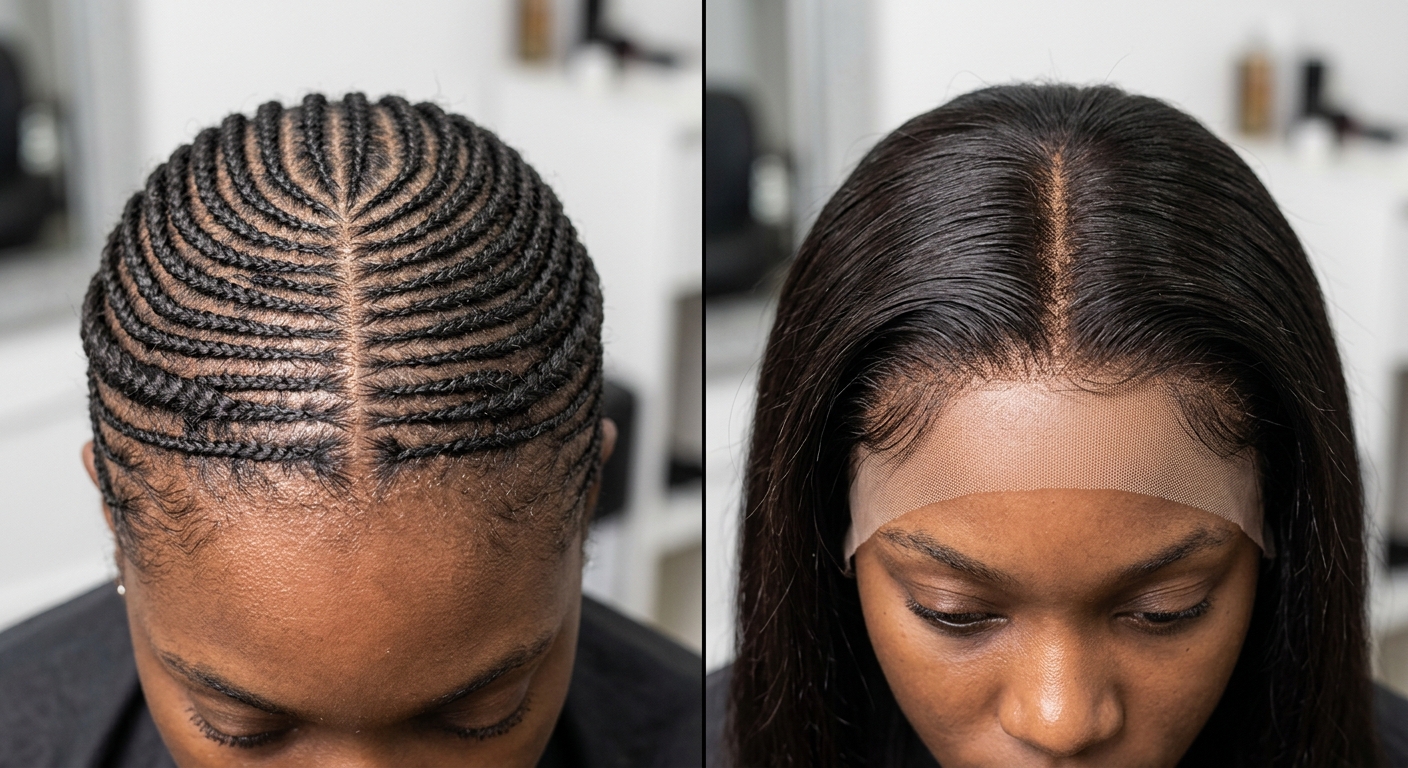
Expensive lace cannot disguise a sloppy cornrow foundation. You can purchase raw donor hair and bleached knots, but thick, uneven plaiting will still push your frontal into an unnatural dome shape. Wig security begins with scalp geometry. The right braid down patterns for wigs protect your natural edges while giving you a smooth, natural-looking profile. Six specialized braid patterns address distinct head shapes, densities, and cap builds to eliminate bulky seams and anchor glueless lace.
Why Searching for a Braid Down for Wig Near Me Often Ends in Helmet Head
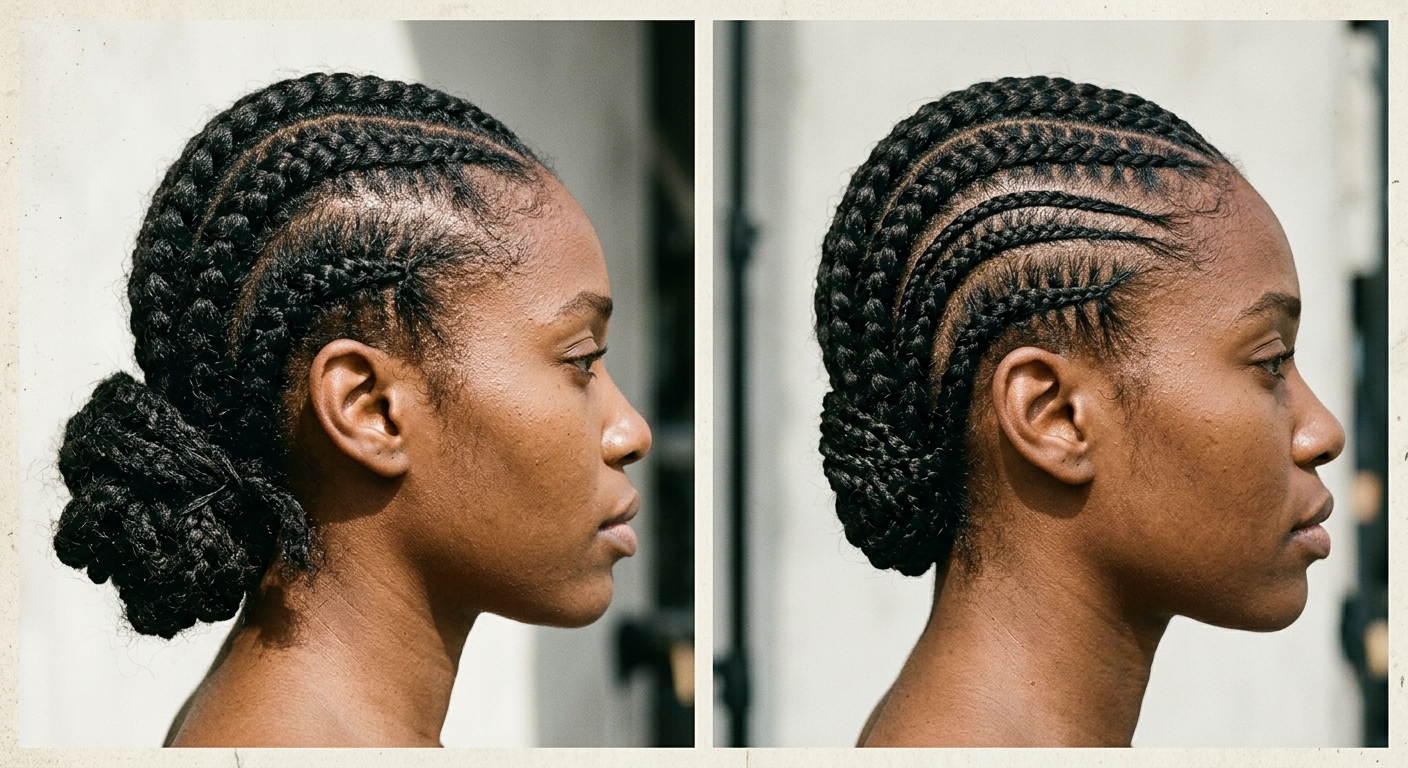
Many braid downs are still built the old way, for heavy sew-in weaves. That creates an immediate structural conflict. Standard sew-ins demand thick, reinforced perimeter braids to anchor needle thread and heavy wefts. An ultra-thin glueless HD lace cap requires the opposite approach. When you place a delicate Swiss or HD lace piece over a dense border of hair, the lace lifts upward. It rests on a shelf of natural hair rather than flush against skin, creating the unmistakable silhouette of helmet head.
The Sew-In Legacy: Why Traditional Cornrows Fail Modern Lace
Braiders often start cornrows directly on baby hairs so the style lasts longer. Pulling fine perimeter hair into tight base braids creates severe tension along the front hairline. Does a flat install require sacrificing your follicles? No. Modern glueless closures require a recessed start, leaving a half-inch perimeter out or gently pressed down so the lace touches bare skin instead of riding on top of a raised track.
Tension Points and Elastic Band Dynamics
Glueless caps do not use liquid adhesive. They rely on internal silicone grips and adjustable elastic bands to stay anchored across your perimeter. These bands exert constant horizontal pressure around the head circumference. If the cornrows underneath cross over each other haphazardly, the band presses those thick intersections directly into your skull. This mismatch leads to sharp headaches by midday and forces the wig to slide backward during standard head turns.
Cranial Mapping: Designing Your Cornrow Foundation Around Head Shape and Density
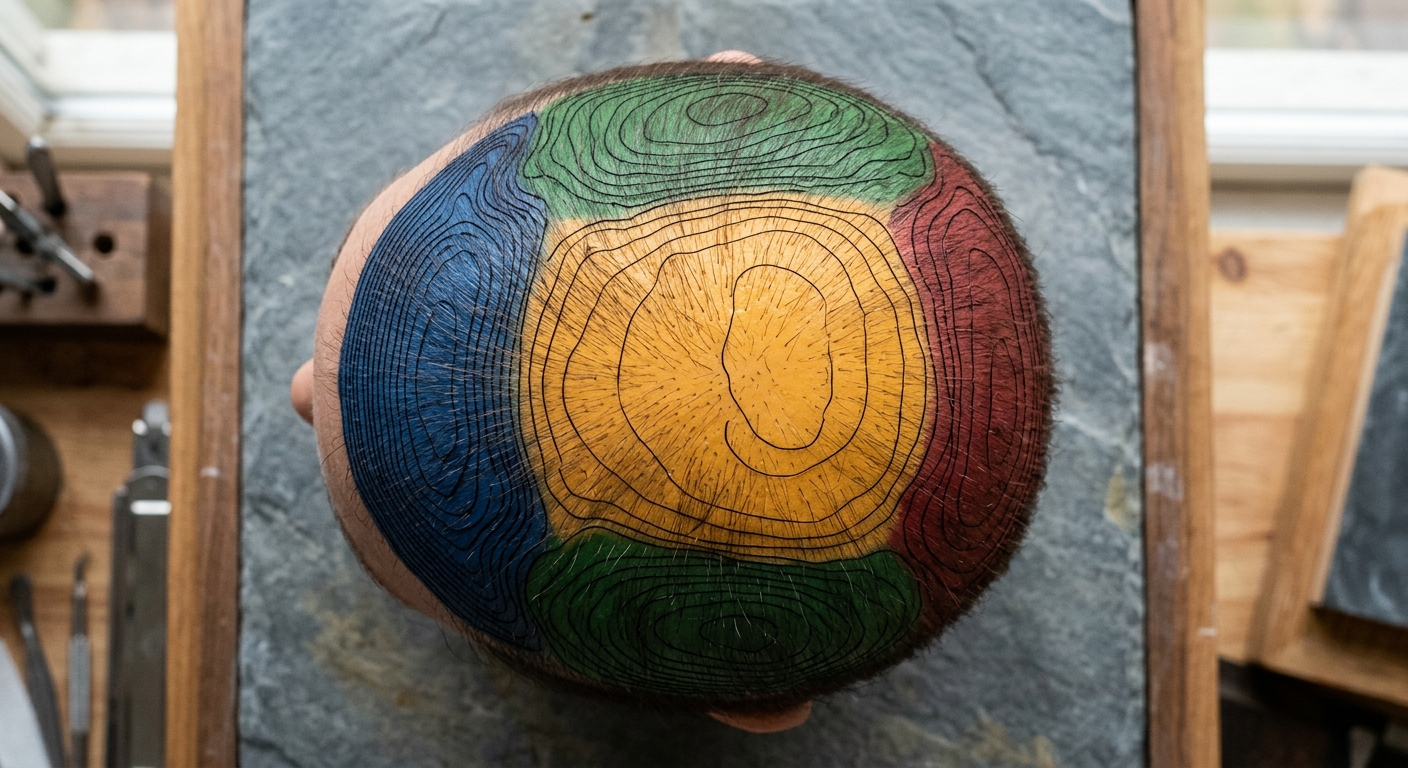
Your head shape determines how a glueless wig sits, shifts, and carries tension throughout the day. Scalps feature natural curves, slopes, and ridges that fight against flat-lying lace if your braider ignores them.
Addressing the Occipital Bone and Flat Crowns
Does your wig ride up in the back by midday? A rounded back of the head often causes this when braid tails are bundled into a bulky knot at the nape. That lump acts like a fulcrum, tilting the wig forward whenever you tilt your neck backward.
Stylists should terminate braids horizontally across the base of the skull instead of stitching them into a vertical bun. For clients with flat crowns, slight cross-over plaits disperse volume evenly under the cap. This gives your crown an even curve without forming a noticeable ridge under your parting space.
Edge Preservation and Dense Type 4 Textures
Preserving fragile hairline edges requires an intentional offset before the first braid starts.
- Position the first row roughly 0.5 inches behind the natural hairline to shield fragile baby hairs and seat silicone wig bands directly against bare skin.
- Blow-stretch coarse type 4 strands completely, then use micro-partings and feed-in sections to keep the foundation paper-thin.
Thick natural coils pack down flat when you divide them into smaller rows. Skipping this prep work guarantees premature wig slippage.
6 Specialized Braid Patterns for Glueless Closures and Frontals
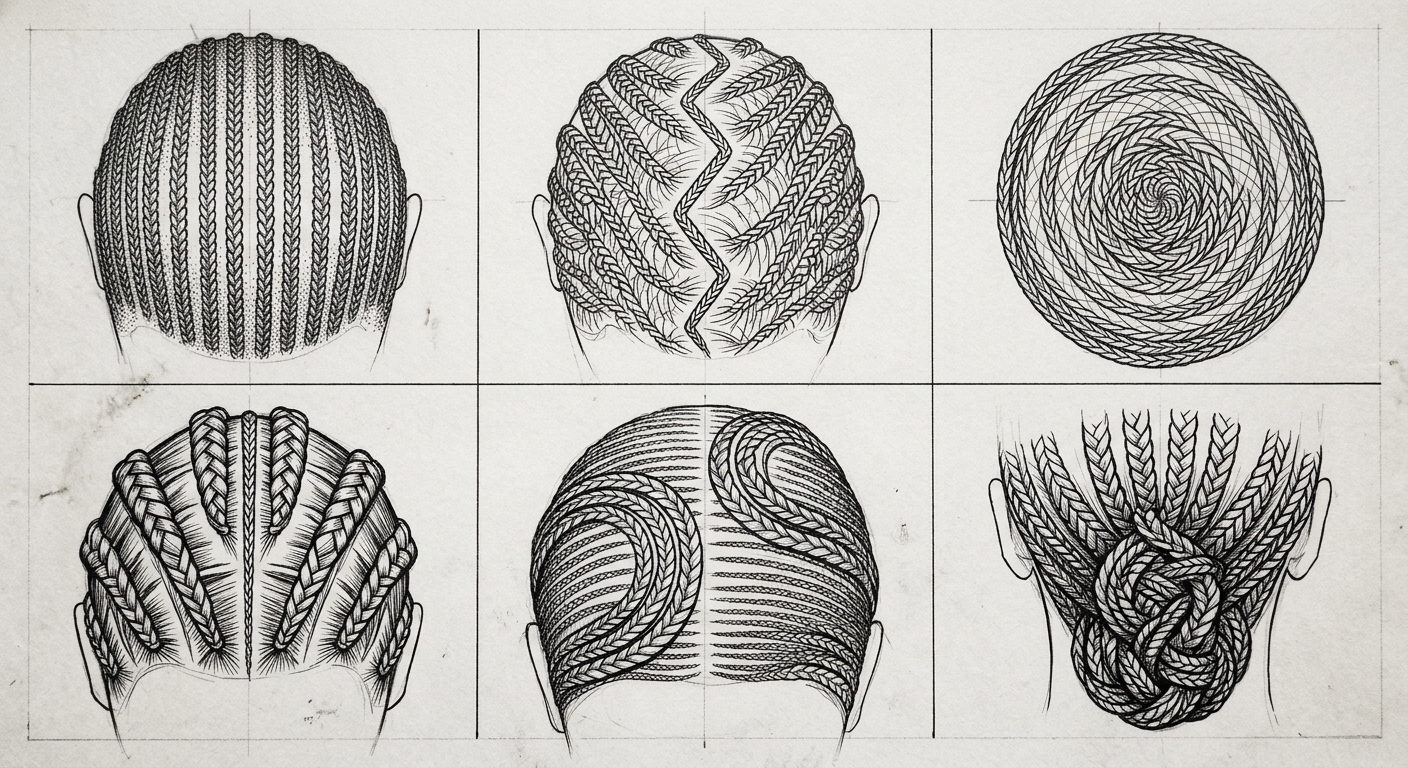
Matching cranial shape to a specific track layout stops your cap from shifting during daily movement. Good braid down patterns for wigs are built around your lace size and natural hair thickness.
Pattern 1: The Precision Micro-Straight Back (10 to 14 Rows)
The precision micro-straight back remains the standard foundation for central and side-parted closure wigs, particularly 4×4 and 5×5 lace units. The stylist parts hair into 10 to 14 uniform, pencil-thin cornrows running directly from the recessed forehead line straight back to the nape. By maintaining narrow, parallel lanes, this pattern distributes natural volume evenly without creating lateral ridges.
To execute this pattern properly, the braider must keep partings strictly parallel. The central two braids must align with the exact spacing of your intended lace part. Leave a quarter-inch gap directly beneath where the lace grid sits so your parted hair reveals scalp rather than a dark braided ridge. Braid tails are linked together at the nape, folded upward, and stitched flat against adjacent rows with needle and weaving thread. This pattern suits oval and round head profiles with medium hair density.
Pattern 2: The U-Curve Perimeter Anchor
Frontals measuring 13×4 and 13×6 require an open, tension-free perimeter from ear to ear. The U-curve anchor routes a single continuous, ultra-thin cornrow in a horseshoe arc around the temples and behind the ears, while interior hair is plaited straight back into that curved border. This geometry prevents the lace tabs above your ears from lifting or catching on bulky braid starts.
The stylist initiates the anchor braid approximately half an inch behind the sideburns and temple hairline. Natural perimeter strands remain loose to prevent traction alopecia along fragile edges. Interior rows feed into the perimeter braid behind each ear rather than hanging down as individual tails. This technique keeps ear tabs resting flush against skin. This helps glueless frontals stay secure for clients who often tuck wig hair behind their ears.
Pattern 3: The Zig-Zag Tension Reliever
Coarse, dense type 4C hair often creates visible bumps under light-density lace when braided strictly in straight lines. The zig-zag pattern alternates braiding angles back and forth across the top of the head before settling into straight tracks toward the lower crown. This shifting angle disperses hair mass horizontally instead of stacking thickness in a single track.
The braider parts hair using shallow diagonal zigs and zags that span roughly one inch in width across the crown. Feed-in technique must remain minimal without adding synthetic braiding hair. By redirecting the braid path, the stylist flattens the crown area without pulling tightly on hair roots. This pattern supports 5×5 closures and 13×4 frontals on clients who experience scalp tenderness from standard linear cornrows.
Pattern 4: The Flat Crown Cross-Over
Clients with a flat or recessed occipital slope often struggle with glueless wigs sliding backward because the cap lacks a natural skeletal contour to grip. The flat crown cross-over solves this problem by intersecting two horizontal braid tracks across the upper mid-crown, creating a subtle, secure shelf for internal wig straps to rest against.
The stylist braids the front half of the head straight back, then splits the tracks diagonally across the crown so left and right rows cross each other once. The crossings are sewn flat with nylon thread to prevent stacked bulk. This cross-over provides natural shape for standard factory caps while keeping the parting area completely smooth. It pairs effectively with 4×4 closures and full lace caps on heart-shaped or flat-backed head shapes.
Pattern 5: The Nape-Tuck Spiral
Long, thick natural hair often forms an unsightly bulge at the nape when braid tails gather at the bottom of the neck. This bulge pushes the back of your wig upward whenever you look down. The nape-tuck spiral routes the perimeter braids around the lower head in concentric circles, culminating in an ultra-flat spiral disc sewn into the hollow curve above the neck.
Starting from the front recessed line, 12 to 16 narrow cornrows feed down to the lower crown. Instead of terminating in free-hanging tails, the stylist weaves the remaining lengths into a continuous flat spiral against the scalp. Every loop of the spiral is secured with a curved needle and thread. The result is a level base that allows deep elastic wig straps to nest directly against the nape depression. It accommodates thick hair under 13×6 frontals and 360 glueless units.
Pattern 6: The Minimalist Six-to-Eight Grid
Fine or low-density hair does not require a dozen tiny braids. Creating too many parts in low-density hair exposes wide scalp gaps and stresses sparse follicles. The minimalist grid relies on six to eight medium-thin cornrows spaced evenly across the skull to provide an even foundation in half the styling time.
The braider uses gentle, consistent tension to guide six to eight rows back, securing the ends flat across the nape with thread. Because the hair is naturally fine, fewer braids still lie completely flat under the lace without creating visible ridges. This pattern allows the scalp to breathe and minimizes mechanical stress on delicate textures. It suits 4×4 and 5×5 closures on fine or straight natural hair types.
Quick-Reference Guide: Matching Lace Sizes and Head Profiles
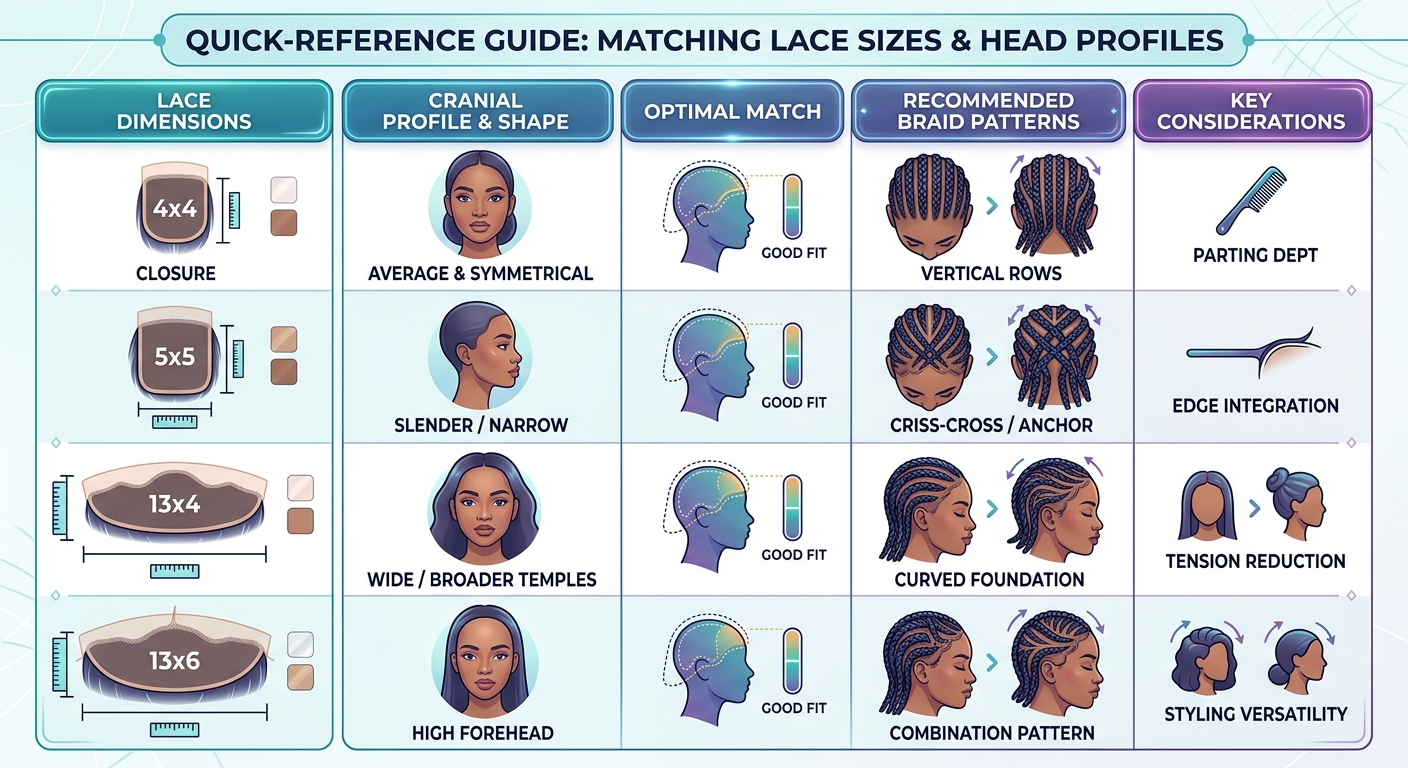
Choosing the right pattern depends directly on your lace dimensions and cranial profile. Review these pairings before booking:
- 4×4 Closure on Oval or Round Head: Precision Micro-Straight Back (10 to 12 rows). Provides clear parting space down the center with minimal bulk at the sides.
- 5×5 Closure on Flat Crown: Flat Crown Cross-Over. Creates balanced contour at the upper crown while maintaining a flat center and off-center parting area.
- 13×4 Frontal on Dense Hair: Zig-Zag Tension Reliever combined with Nape-Tuck Spiral. Eliminates track ridges beneath temple lace and removes nape bulk.
- 13×6 Frontal on Prominent Occipital Bone: U-Curve Perimeter Anchor with horizontal nape stitch. Keeps ear tabs completely flush and locks elastic bands under the bone ridge.
- Fine or Fragile Hair with Any Closure: Minimalist Six-to-Eight Grid. Reduces parting tension and protects delicate follicles from excessive friction.
Interior Cap Mechanics: Aligning Combs, Bands, and Parting Space
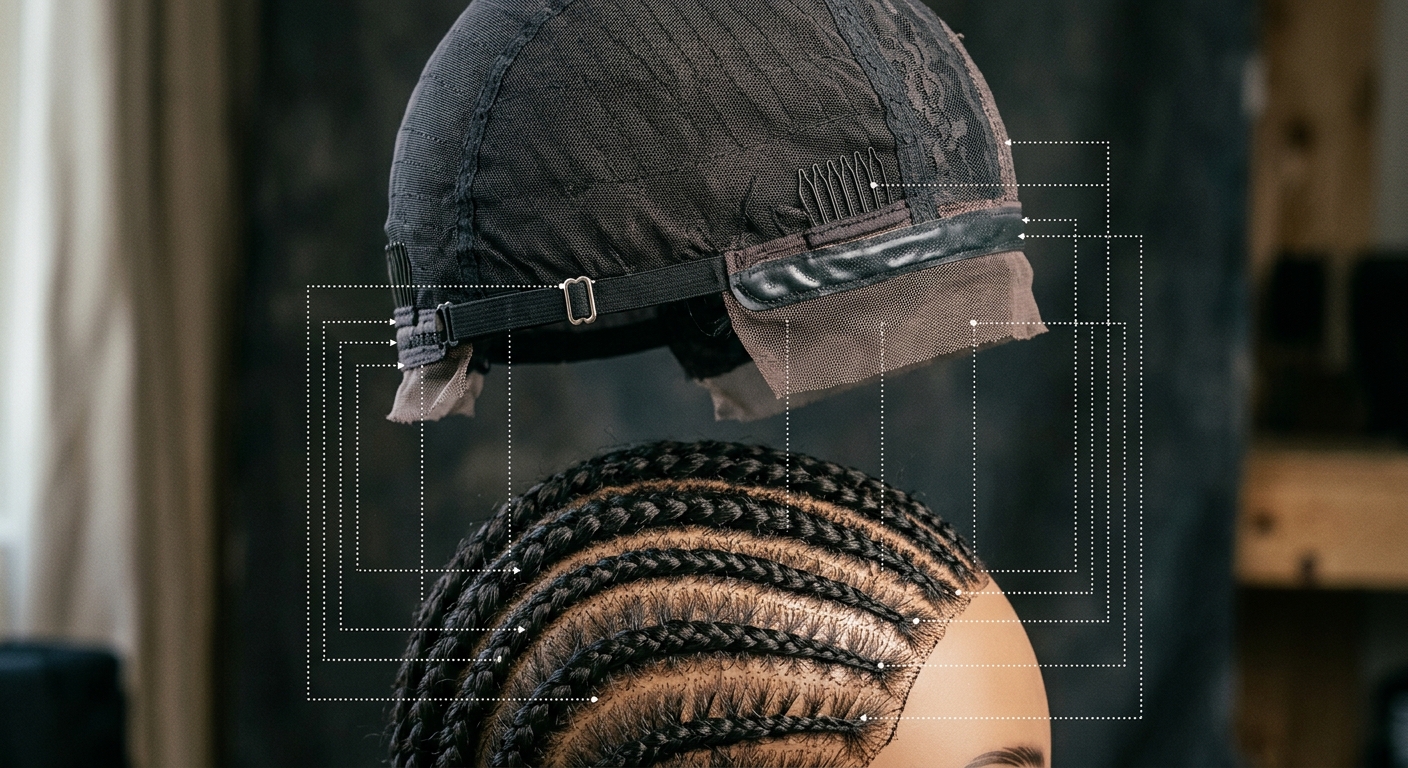
Comb teeth forced against thick braid crossings trigger scalp soreness within hours. Avoid that pressure by sliding combs directly beneath flat horizontal tracks instead. Does your cap shift when you turn your head? That movement happens when interior hardware fights your base rather than nesting inside its natural recessed channels.
Placing Comb Teeth Away from Raised Braid Intersections
Factory-sewn wig combs demand smooth runways. When you push comb teeth directly into the intersections where two braids meet, you concentrate severe localized pressure on hair roots. Slide each comb underneath the flattest segment of an adjacent braid track, preferably midway between crossings. This anchors the foundation firmly so prongs do not dig into sensitive skin.
Integrating Straps and Parting Depth
Elastic bands require deliberate positioning to maintain tension without distorting the hairline. Fasten the inner strap into the hollow depression at the base of your skull rather than higher on the round curvature of your head. Placing the band along this lower hollow secures the entire unit without dragging delicate lace backward during normal head movement.
Your braid parts must correspond with your styling window:
- Align the widest, flattest gap between your braids directly beneath the parting grid to mimic realistic scalp depth.
- Pull a sheer stocking cap tinted to your exact skin tone over the rows to prevent raw knots from abrading fragile hair cuticles.
Nighttime Maintenance: Keeping Your Braid Down Flat Between Installs
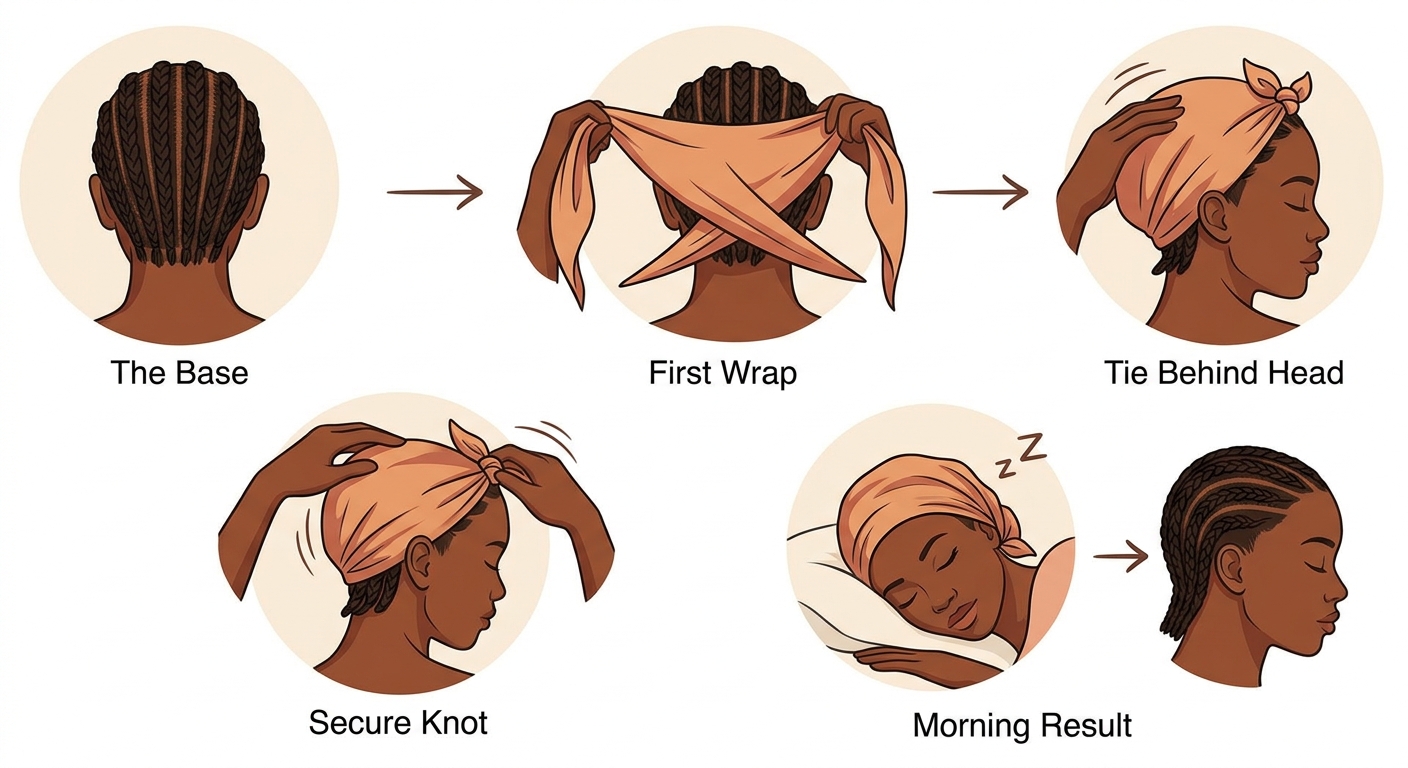
A fresh braid down should remain flush to the scalp for two to three weeks. However, sleeping carelessly will cause frizz, lift base cornrows, and loosen anchor stitches within days. Proper night care preserves your flat profile so your glueless wig slips on smoothly each morning without added manipulation.
Silk Scarves versus Satin Bonnets
Many wig wearers make the mistake of relying solely on a loose satin bonnet at night. A loose bonnet protects natural hair from friction, but it does nothing to hold base cornrows down against the scalp. As you toss and turn, the braid tracks expand and frizz out, creating unwanted loft under your lace.
To preserve maximum flatness, use a targeted two-step wrap system:
- Lay a smooth, non-stretch silk or satin scarf firmly across the top and sides of your braids, tying the knot at the base of your neck. The compressive tension of the scarf keeps the cornrows flat to your skull and locks flyaways down.
- Place an oversized satin bonnet over the entire wrap to secure loose braid tails and protect the perimeter knot from slipping off during sleep.
Never sleep with your glueless wig installed if your base braids are loose underneath. Removing the wig each night allows your scalp to breathe and prevents internal combs from grinding against your natural perimeter tracks while you rest.
The Stylist Translation Script: How to Book a Local Braid Down Service
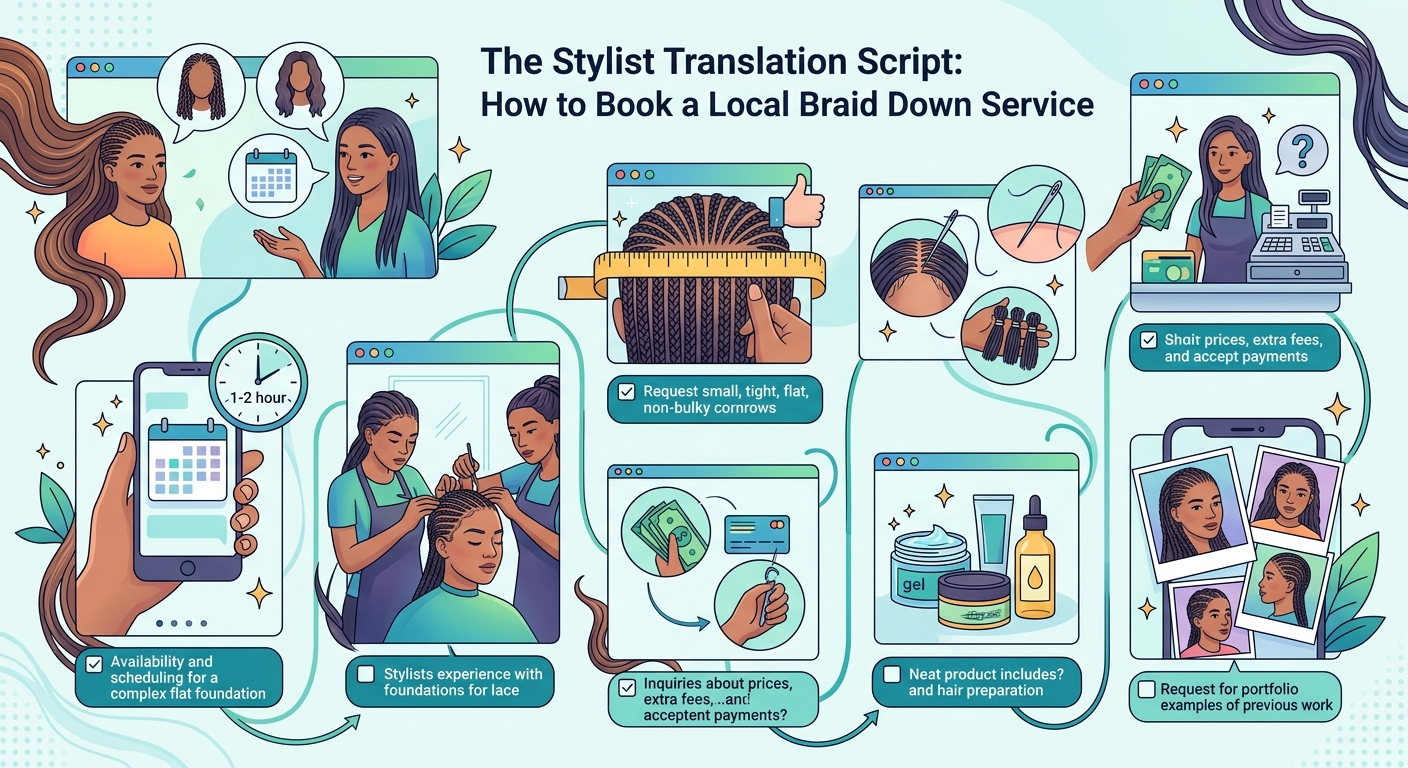
Standard braiding salons focus on external longevity. They pull hair taut and knot ends with rubber bands that form bulky lumps under lace. When choosing a braider for your foundation, look for one who regularly does braid downs. Review client portfolios to verify their cornrows are thin, uniform, and sewn flat without bulky knots.
Vetting Questions and the Appointment Script
Ask these questions before confirming your appointment:
- “Do you braid flat foundations specifically for glueless lace wigs?”
- “Will you secure my braid tails with needle and thread rather than rubber bands?”
- “Can you leave out a half-inch perimeter along my natural hairline to protect my edges?”
When you sit in the chair, give your braider these clear parameters:
- “Please braid 10 to 12 small cornrows straight back toward the nape using moderate, even tension.”
- “Fold the braid tails upward and sew them flat against the base tracks using needle and thread.”
“Please leave out about a half-inch perimeter along my front hairline and temples.”
Pre-Appointment Cleansing and Stretching
Do braiders expect clean hair? Yes, and preparing dense textures beforehand cuts braid bulk significantly. Wash with a clarifying shampoo to clear product residue, then mist strands with a light, water-based leave-in conditioner. Avoid heavy butters or thick pomades that attract lint and slow drying beneath a wig cap.
Tension blow-dry your hair in small sections using a paddle brush. This stretches tight coils completely flat, keeping your base sleek without painful scalp pull. Arriving at your local salon appointment fully stretched allows your braider to achieve the thinnest possible tracks.
Protect Your Edges and Eliminate Helmet Head
A wig cannot sit flatter than the cornrows underneath it. When you put on a glueless unit, the lace requires bare, flat contact with your skin to look authentic. Thick straight-backs create stubborn ridges right where your lace parting sits.
Knowing your head shape before you sit in the stylist chair changes everything. Frontals require flat perimeter anchoring behind the ears. Deep closures demand clean spacing directly under the parting grid. Matching your braid direction to your specific cap construction eliminates the lumps that reveal an install.
Take your chosen pattern to your next salon appointment. Hand the exact row counts and anchor directions to your braider. When your base rows sit flush against your occipital bone, interior combs slide into place smoothly. Ready for a flat, edge-safe foundation? Book your braid down at Slayy By Che’s private studio in Jonesboro at slayybyche.com/book-appointment.